Part 5: Sprite Renderer
Table of contents
What is a Sprite Renderer?
A Sprite Renderer is a component in Unity used primarily for rendering 2D graphics, such as images and sprites, within a scene. It allows you to display 2D textures or sprites in the game world, making it an essential part of creating 2D games or incorporating 2D elements into a 3D game. By adjusting the Sprite Renderer’s properties, you can control aspects like sorting order, flip sprites, and more to achieve the desired visual effects in your game.
Sprite Renderer Properties
Find the Sprite Renderer component that is attached to your Armor GameObject.
- Select the
WeaponGameObject in theHierarchy` - In the
Inspectortab, find theSprite Renderercomponent
![]()
Sprite Property
The Sprite allows you to change the sprite that is currently being displayed. There are multiple ways to do this. One option is to drag a new sprite into the inspector:
Another option is to click the small circle in the Inspector and select a sprite from the drop down menu:
Note: There are many more ways to modify this property. You will learn about some of them later in this project.
Color
The Color property allows you to add a color Hue to your sprites as well as changing the alpha channel. When the Color is set to be 100% white, there is no Hue applied:
What is an Alpha Channel?
An Alpha Channel is a component of an image, typically a texture or a picture, that stores information about the transparency of each pixel. It defines how opaque or transparent each pixel should be, allowing for the precise rendering of objects with irregular or smooth edges, as well as enabling effects like soft edges and transparency in graphics and images.
Flip
The Flip properties allow you to flip the sprite in the X and Y direction. This is useful for easily controlling a character that is moving left, right, up, or down on the screen:
Draw Mode, Mask Interaction, Sprite Sort Point, Material
These properties can be useful for a variety of useful effects. However, we won’t be using them in this project. However, if you’d like to know more about them I encourage you to read the friendly manual: Unity Manual
Sorting Layer / Order in Layer
If you attempted to complete the Bonus from the last section, you likely tried to adjust these settings. These settings allow you to specify the order in which sprites that overlap are drawn to the screen.
For example, your Weapon GameObject might be drawn behind your Armor GameObject:
Order in Layer
By default, a Sprite Renderer is placed on the Default sorting layer. The Order in Layer then determines the order in which they are drawn. Lower numbers are drawn first and thus end up BEHIND those with higher numbers.
You can ensure the Armor is always drawn above the Heroine Base by setting it to be drawn later with a higher order. Similarly, you can ensure the Weapon is drawn above the Armor by setting its Order in Layer to be higher (later) than the Armor.
- Set
Heroine Baseto haveOrder in Layer: 0 - Set
Armorto haveOrder in Layer: 1 - Set
Weaponto haveOrder in Layer: 2
Sorting Layer
If you’re thinking, “This is going to be hard to remember if I add even more items”. You’re right! It will become increasingly difficult to manage. This is where a Sorting Layer comes in handy.
A Sorting Layer allows you to define a named layer. This makes it much easier to manage and remember as you add additional elements to your scene.
Opening the Tags & Layers Settings
- Click the
Layersdropdown in the top right of the default layout - Select
Edit Layers
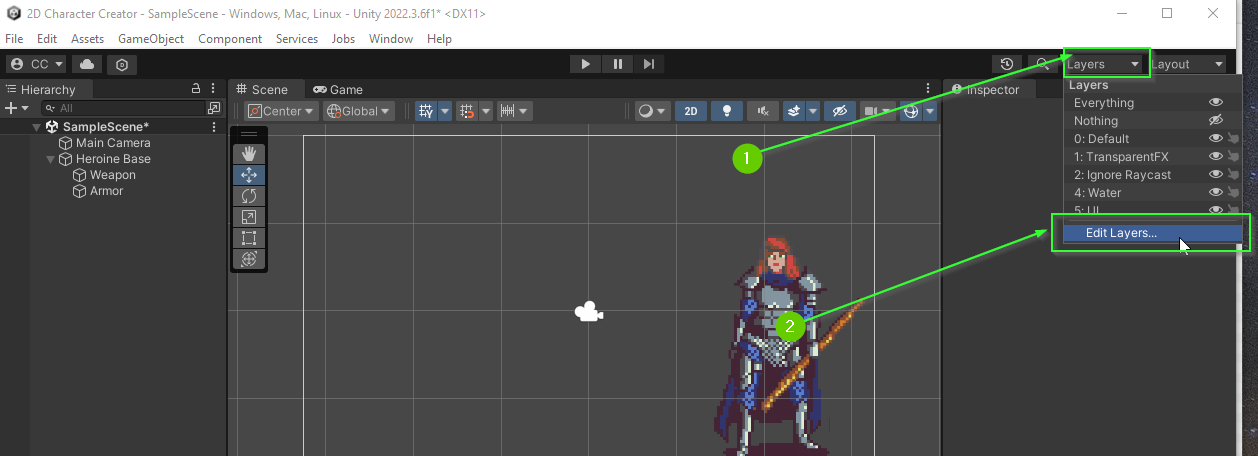
This will open the projects Tags & Layers settings in the Inspector tab:
Creating a Sorting Layer
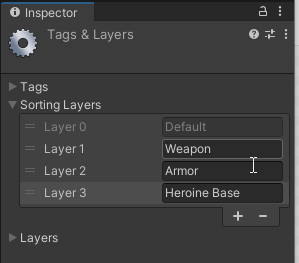
- Click the expansion arrow next to
Sorting Layers - Click the
+icon to create a new sorting layer - Modify the name of the new layer to
Weapon
Challenge
Repeat the process above to create a layer for your Heroine Base and Armor.
When you’re done, you should have 3 layers:
Sprite Renderer Sorting Layer
With your Sorting Layers defined, you can now set the Sorting Layer property on your Sprite Renderers to the appropriate layer. Start with your Heroine Base.
- Select the
Heroine Basein theHierarchy - Find the
Sprite Rendererin theInspector - Under
Additional Settings - Set
Sorting LayertoHeroine Base
Re-ordering Layers
In the video above, the Heroine Base sprite is now appearing on top of the Weapon and Armor sprites! This is because the Heroine Base layer is “above” the Default layer. To fix this, we need to re-order the sorting layers.
- Open the Layer Editor
- If necessary, expand the
Sorting Layers - Drag the
Heroine Baselayer such that it is above theDefault Layer
Challenge
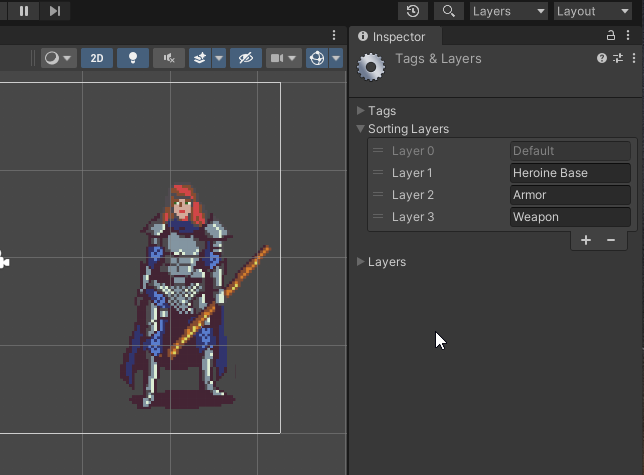
Using what you’ve learned, can you update the Sorting Layer for each of your Sprite Renderers? Don’t forget to adjust the layer orders.
If all went well, you scene and layers should look similar to the image below:
What’s Next?
In Part 6: Buttons you will learn how to use Unity’s canvas system to display buttons on the screen.
Join the Discussion
Before commenting, you will need to authorize giscus. Alternatively, you can add a comment directly on the GitHub Discussion Board.