Part 9: Changing Shops
Table of contents
Challenge: Create a Shop Menu
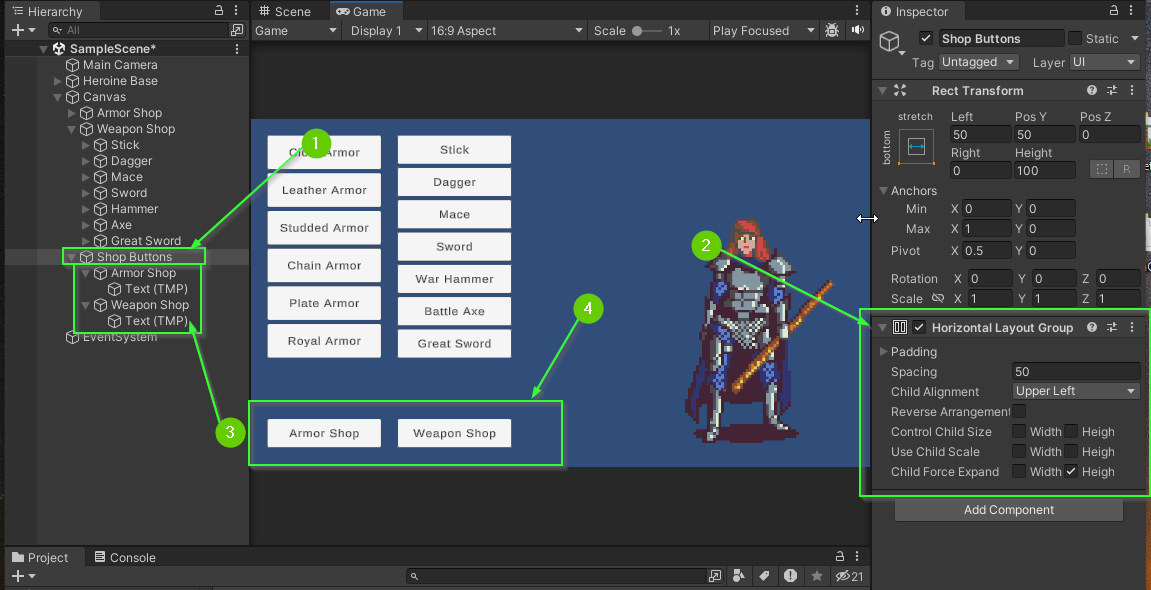
Next, you will add a Shop Menu that contains 2 buttons. One for your Armor Shop and one for your Weapon Shop.
- Create a new empty
GameObjectwithin yourCanvascalledShop Buttons - Add a
Horizontal Layout Groupcomponent (Optional) - Add two new
Buttons to yourShop Buttonscomponent - Place your
Shop Buttonson your screen in a way that looks good to you
When you’ve finished, your scene should look similar to this:
Enabling and Disabling a GameObject
GameObjects can be enabled and disabled in a scene through the Inspector tab.
- Click your
Armor Shopbutton in theHierarchy - Locate the check box next to the buttons name in the
Inspector - Check the box on and off.
Notice when you do, the GameObject name in the Hierarchy window will change to a light gray color and the button disappears from the Game and Scene tabs. When a GameObject is enabled it is said to be active. The video below demonstrates the Armor and Weapon shop buttons being enabled and disabled.
Using the SetActive Method
You can enable and disable a GameObject using a button by using its SetActive method. You will next modify the Armor Shop button to display the armor buttons hide the weapon buttons.
First, disable the armor buttons and weapon buttons.
- Select the armor buttons parent GameObject in the
Hierarchy - In the
Inspector, disable the buttons
- Repeat this process for your weapon buttons.
- Select the
Armor Shopbutton in theHierarchy - In the
Inspectorfind the button component - Add an
Event Listenerto the button’sOnClick Event
- Add the armor buttons parent GameObject to the Event Listener
- Click the drop down to set the function to use when the button is clicked
- Select
GameObject>SetActive (bool)
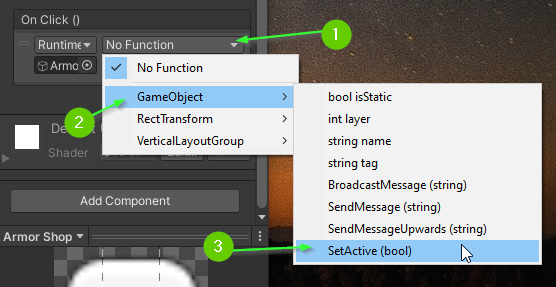
- Click the check box below the
GameObject.SetActivefunction.
Note: If it is checked, it means that the registered GameObject will be set to active. If it is unchecked, it means that the registered GameObject will be set to be not active.

- Enter Play Mode and test your
Armor Shopbutton
Challenge: Switching Between Shops
- Update the
Weapon Shopbutton to activate the weapon buttons.
When you’re finished, your scene should look similar to the one below:
Challenge: Closing the Weapon / Armor Shops
You can add multiple Event Listeners to a single event which can allow a single button to result in multiple actions.
- Update your
Armor Shopbutton to also deactivate your weapon buttons when it is clicked - Update your
Weapon Shopbutton to also deactivate your armor buttons when it is clicked
When you’re finished, your scene should look similar to the one below:
What’s Next?
In Part 10: Adding Text, you will learn how to add in text labels that will eventually display information about your selected items!
Join the Discussion
Before commenting, you will need to authorize giscus. Alternatively, you can add a comment directly on the GitHub Discussion Board.